webpack自定义Plugin
总结
三. 自定义Plugin
3.1. 介绍tapable
3.2. Hooks的使用
- synchook
- bail
- loop
- waterfall
- parallel: 并行
- series: 串行
4.1. 自定义Plugin原理
- 回顾源码
- 插件的注册
- compiler.hooks.xxx.tapAsync
4.2. 搭建注册Plugin项目
class AutoUploadWebpackPlugin {
    apply(compiler) {}
}
4.3. 自动上传的功能逻辑
- 1.获取打包后的文件夹
- 2.连接远程服务器
- 3.删除远程服务器文件中内容
- 4.上传文件夹的内容
- 5.断开ssh连接
tapable介绍
Webpack和Tapable
我们知道webpack有两个非常重要的类:Compiler和Compilation
- 他们通过注入插件的方式,来监听webpack的所有生命周期;
- 插件的注入离不开各种各样的Hook,而他们的Hook是如何得到的呢?
- 其实是创建了Tapable库中的各种Hook的实例;
所以,如果我们想要学习自定义插件,最好先了解一个库:Tapable
- Tapable是官方编写和维护的一个库;
- Tapable是管理着需要的Hook,这些Hook可以被应用到我们的插件中;
Tapable有哪些Hook呢?
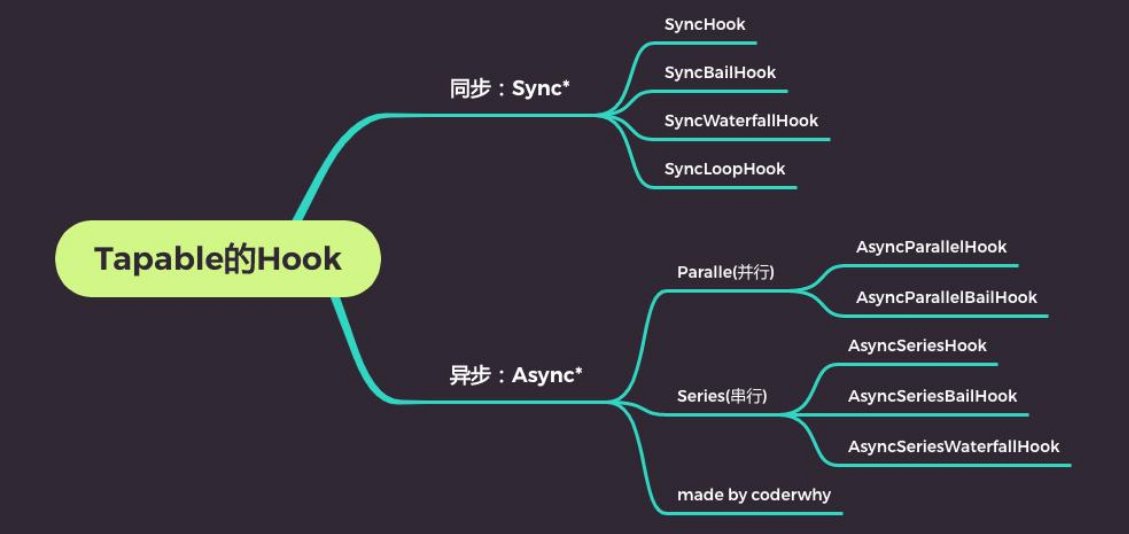
Tapable的Hook分类
同步和异步的:
- 以sync开头的,是同步的Hook;
- 以async开头的,两个事件处理回调,不会等待上一次处理回调结束后再执行下一次回调;
其他的类别
- bail:当有返回值时,就不会执行后续的事件触发了;
- Loop:当返回值为true,就会反复执行该事件,当返回值为undefined或者不返回内容,就退出事件;
- Waterfall:当返回值不为undefined时,会将这次返回的结果作为下次事件的第一个参数;
- Parallel:并行,不会等到上一个事件处理回调结束,才执行下一次事件处理回调;
- Series:串行,会等待上一是异步的Hook;
Hook的使用过程
- 第一步:创建Hook对象

- 第二步:注册Hook中的事件

- 第三步:触发事件

同步hook
- sync基本使用
const { SyncHook } = require('tapable')

class HYCompiler {
  constructor() {
    this.hooks = {
      // 1.创建hooks
      syncHook: new SyncHook(["name", "age"])
    }


    // 2.用hooks监听事件(自定义plugin)
    this.hooks.syncHook.tap("event1", (name, age) => {
      console.log("event1事件监听执行了:", name, age)
    })

    this.hooks.syncHook.tap("event2", (name, age) => {
      console.log("event1事件监听执行了:", name, age)
    })
  }
}

const compiler = new HYCompiler()
// 3.发出去事件
setTimeout(() => {
  compiler.hooks.syncHook.call("why", 18)
}, 2000);
- sync_Bail使用
const { SyncBailHook } = require('tapable')

class HYCompiler {
  constructor() {
    this.hooks = {
      // 1.创建hooks
      // bail的特点: 如果有返回值, 那么可以阻断后续事件继续执行
      bailHook: new SyncBailHook(["name", "age"])
    }


    // 2.用hooks监听事件(自定义plugin)
    this.hooks.bailHook.tap("event1", (name, age) => {
      console.log("event1事件监听执行了:", name, age)
      return 123
    })

    this.hooks.bailHook.tap("event2", (name, age) => {
      console.log("event1事件监听执行了:", name, age)
    })
  }
}

const compiler = new HYCompiler()
// 3.发出去事件
setTimeout(() => {
  compiler.hooks.bailHook.call("why", 18)
}, 2000);
- sync_loop的使用
const { SyncLoopHook } = require('tapable')

let count = 0

class HYCompiler {
  constructor() {
    this.hooks = {
      // 1.创建hooks
      // bail的特点: 如果有返回值, 那么可以阻断后续事件继续执行
      loopHook: new SyncLoopHook(["name", "age"])
    }


    // 2.用hooks监听事件(自定义plugin)
    this.hooks.loopHook.tap("event1", (name, age) => {
      if (count < 5) {
        console.log("event1事件监听执行了:", name, age)
        count++
        return true
      }
    })

    this.hooks.loopHook.tap("event2", (name, age) => {
      console.log("event1事件监听执行了:", name, age)
    })
  }
}

const compiler = new HYCompiler()
// 3.发出去事件
setTimeout(() => {
  compiler.hooks.loopHook.call("why", 18)
}, 2000);
- sync_waterfal的使用
const { SyncWaterfallHook } = require('tapable')

class HYCompiler {
  constructor() {
    this.hooks = {
      // 1.创建hooks
      waterfallHook: new SyncWaterfallHook(["name", "age"])
    }


    // 2.用hooks监听事件(自定义plugin)
    this.hooks.waterfallHook.tap("event1", (name, age) => {
      console.log("event1事件监听执行了:", name, age)

      return {xx: "xx", yy: "yy"} //当返回值不为undefined时,会将这次返回的结果作为下次事件的第一个参数
    })

    this.hooks.waterfallHook.tap("event2", (name, age) => {
      console.log("event1事件监听执行了:", name, age)
    })
  }
}

const compiler = new HYCompiler()
// 3.发出去事件
setTimeout(() => {
  compiler.hooks.waterfallHook.call("why", 18)
}, 2000);
异步hook的使用
异步hook要使用tapAsync监听,callAsync触发
async_paralle的使用
const { AsyncParallelHook } = require('tapable')

class HYCompiler {
  constructor() {
    this.hooks = {
      // 1.创建hooks
      parallelHook: new AsyncParallelHook(["name", "age"])
    }


    // 2.用hooks监听事件(自定义plugin)
    this.hooks.parallelHook.tapAsync("event1", (name, age) => {
      setTimeout(() => {
        console.log("event1事件监听执行了:", name, age)
      }, 3000);
    })
   //两个并行执行
    this.hooks.parallelHook.tapAsync("event2", (name, age) => {
      setTimeout(() => {
        console.log("event2事件监听执行了:", name, age)
      }, 3000);
    })
  }
}

const compiler = new HYCompiler()
// 3.发出去事件
setTimeout(() => {
  compiler.hooks.parallelHook.callAsync("why", 18)
}, 0);
- async_series的使用
const { AsyncSeriesHook } = require('tapable')

class HYCompiler {
  constructor() {
    this.hooks = {
      // 1.创建hooks
      // bail的特点: 如果有返回值, 那么可以阻断后续事件继续执行
      seriesHook: new AsyncSeriesHook(["name", "age"])
    }


    // 2.用hooks监听事件(自定义plugin)
    //两个串行执行,只有等到上一个async hook有结果之后,才会执行下一个。
    this.hooks.seriesHook.tapAsync("event1", (name, age, callback) => {
      setTimeout(() => {
        console.log("event1事件监听执行了:", name, age)
        callback()
      }, 3000);
    })

    this.hooks.seriesHook.tapAsync("event2", (name, age, callback) => {
      setTimeout(() => {
        console.log("event2事件监听执行了:", name, age)
        callback()
      }, 3000);
    })
  }
}

const compiler = new HYCompiler()
// 3.发出去事件
setTimeout(() => {
  compiler.hooks.seriesHook.callAsync("why", 18, () => {
    console.log("所有任务都执行完成~")
  })
}, 0);
自定义Plugin
- 在之前的学习中,我们已经使用了非常多的Plugin:
- CleanWebpackPlugin
- HTMLWebpackPlugin
- MiniCSSExtractPlugin
- CompressionPlugin
- 等等。。。
- 这些Plugin是如何被注册到webpack的生命周期中的呢?
- 第一:在webpack函数的createCompiler方法中,注册了所有的插件;
- 第二:在注册插件时,会调用插件函数或者插件对象的apply方法;
- 第三:插件方法会接收compiler对象,我们可以通过compiler对象来注册Hook的事件;
- 第四:某些插件也会传入一个compilation的对象,我们也可以监听compilation的Hook事件;
开发自己的插件
如何开发自己的插件呢?
- 目前大部分插件都可以在社区中找到,但是推荐尽量使用在维护,并且经过社区验证的;
- 这里我们开发一个自己的插件:将静态文件自动上传服务器中;
自定义插件的过程:
创建AutoUploadWebpackPlugin类;
编写apply方法:
- 通过ssh连接服务器;
- 删除服务器原来的文件夹;
- 上传文件夹中的内容;
在webpack的plugins中,使用AutoUploadWebpackPlugin类;
const { NodeSSH } = require('node-ssh')
const { PASSWORD } = require('./config')

class AutoUploadWebpackPlugin {
  constructor(options) {
    this.ssh = new NodeSSH()
    this.options = options
  }

  apply(compiler) {
    // console.log("AutoUploadWebpackPlugin被注册:")
    // 完成的事情: 注册hooks监听事件
    // 等到assets已经输出到output目录上时, 完成自动上传的功能
    compiler.hooks.afterEmit.tapAsync("AutoPlugin", async (compilation, callback) => {
      // 1.获取输出文件夹路径(其中资源)
      const outputPath = compilation.outputOptions.path

      // 2.连接远程服务器 SSH
      await this.connectServer()

      // 3.删除原有的文件夹中内容
      const remotePath = this.options.remotePath
      this.ssh.execCommand(`rm -rf ${remotePath}/*`)

      // 4.将文件夹中资源上传到服务器中
      await this.uploadFiles(outputPath, remotePath)

      // 5.关闭ssh连接
      this.ssh.dispose()

      // 完成所有的操作后, 调用callback()
      callback()
    })
  }

  async connectServer() {
    await this.ssh.connect({
      host: this.options.host,
      username: this.options.username,
      password: this.options.password
    })
    console.log('服务器连接成功')
  }

  async uploadFiles(localPath, remotePath) {
    const status = await this.ssh.putDirectory(localPath, remotePath, {
      recursive: true,
      concurrency: 10
    })
    if (status) {
      console.log("文件上传服务器成功~")
    }
  }
}

module.exports = AutoUploadWebpackPlugin
module.exports.AutoUploadWebpackPlugin = AutoUploadWebpackPlugin